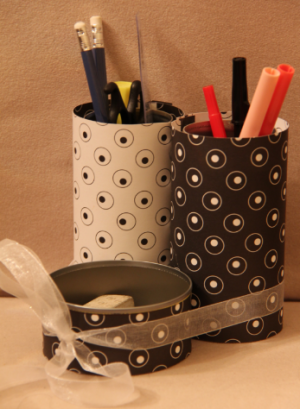
 What you need:
- Two empty soup cans
- One empty tuna can
- Decorative paper
- Craft glue
- Elastic bands
- Ribbon
What you do:
First, make sure all the cans are clean and dry. Next, cut three pieces of decorative paper to the same height as the cans, and wide enough to wrap around each can with a little overlap. Starting with one can, spread glue on the overlapping edge of the paper, wrap the paper around the can and press the edge shut. Use an elastic band to hold the paper in place until the glue dries. Repeat with the two other cans.
When the glue has dried, remove the elastic bands from the two larger cans and run a bead of glue down the seams, then press them together. Again, secure them with elastic bands until the glue dries. With the seam inward, attach the tuna can to the two other cans with craft glue and secure them all with an elastic band.
When all the glue has dried, remove the elastic band and secure the three cans with a decorative ribbon. Now you have an attractive organizer to help keep your desk in order. You can keep pencils and pens close at hand in the larger cans, and erasers, thumbtacks and paper clips in the smaller can.








This is also a great thing for your school locker
Me and my sister are making this:)Add me as a friend @ owl235
so cute, i just dont have fancy paper
Neat! That is awesome for my desk!
This is a great way to reuse and recycle! Love this idea!
I agree!!!! :)
Let’s make the world a better place, let’s make the wo-o-orld a better place. lets-lets-make-ma-the world a better place oh yes. the world a better place!
AAAAAAAAAAAAAAAAAAAAAAAAAAAAAAA!!! those are SO cute!!!! I love them!!
i like the new craft !
CUTE! I probably won’t do it though! :(
oh man! by the time this was posted… it was second!
I love this idea and the colors you used in the photo are amazing. They could be for a boy or a girl and look like something we would buy in a department store. I am so making these for my big brother when he goes to college naxt year.
Nice!
THIS IS A GREAT IDEA AND SIMPLE TO MAKE…I WILL BE DOING THIS IDEA THANKS FOR THIS IDEA I LOVE IT…PLEASE PUT THE CLOWN CAR IN WISH FACTORY WHEN YOU DO UPDATES TOMORROW…THANKS
THIS IS A GREAT IDEA…IF YOU WANTED TO YOU COULD GET YOUR CHILDREN TO DECORATE PAPER TO USE AROUND THE CANS…OR PUT PLAIN PAPER ON IT AND ATTACHED MAGNETS SINCE IT IS A CAN, MAGNETS WOULD STICK…YOU COULD ALSO ATTACHED PLAIN PAPER AND THEN DECOUPAGE PICTURES THAT YOU LIKE TO IT…JUST A FEW IDEAS TO MAKE THIS YOUR OWN…
Or you could duck tape it :D !!! Love this idea I might give it a try! Looks creative and cool!
I agree! It looks gorgeous, so delicate but modern! The designs are beutiful too! I am going to try that because I am home sick today, it is weird because I can still go on Webkinz! Well, my stomach is what is hurting-not my head and the computer can stress my head even more!
Be careful and remember to cover the top edge of the can as well -
because the sharp metal from where the lid was cut can still nick you if exposed.