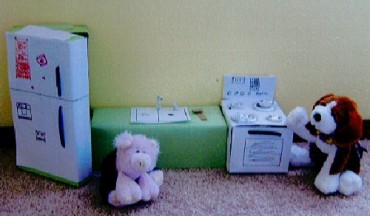
Submitted by: bea with shiloh

What you need:
- Small gift box
- Shoe box with lid attached on one side
- Tissue Box
- 4 sheets of white paper
- 6” of tin foil
- Two 6 x 4 ¾” pieces cardboard
- 4 ½ x 5” piece of cardboard
- 6 pipe cleaners (11 ½” long)
- 1 piece of construction paper (any color)
- Pencil
- Ruler
- Markers
- Tape
- Scissors
- Glue
What you do:
Oven:
1. Mark with pencil on small gift box which sides you want to be the top, right, left and front sides of your oven.
If you want your oven to open, make sure that you mark the lid part of the box as “front”.
2. With your ruler, measure the dimensions on the “top” section of the box.
3. Measure the right, left and front sides of the box.
4. Using the white paper, cut out the same measures as you just marked for your oven. On the back of each cutout, mark what side of your oven they will be placed on, and tape the cutouts to the corresponding sides of your box.
5. Take two pipe cleaners, and cut them in half.
6. Cut four one-inch pieces of tin foil. Fold the pieces in half.
7. Wrap each piece of tin foil around pipe cleaners. Make sure to crinkle any excess foil hanging off of the pipe cleaners. Bend in a spiral shape and glue to top of oven.
8. Take the 4 ½ by 5” piece of cardboard and cover the top half with white paper. Using a marker, make dials and buttons. Tape this to the backside of the oven.
9. Draw a window on the front of the oven.
10. Take another pipe cleaner. Using a pen, carefully poke two holes on the front of the oven. Poke pipe cleaner through these holes, and twist them together on the inside of the oven. This makes the handle of your oven.
Counter with Sink:
1. Cover the front and top of tissue box with colored construction paper by using tape or glue.
2. Cut 5 by 4” piece of regular white paper. Glue it on the middle of the tissue box. Draw a drain. This is the sink of your counter.
3. Cut one pipe cleaner in half. Cut two one-inch pieces of tin foil. Cover pipe cleaners. Poke two holes with pen, and push pipe cleaners in the two holes, making the faucet and the handle of sink.
Refrigerator:
1. Cover lid of box with regular white paper by using tape or glue.
2. Use markers to draw some feathers on the lid of your fridge. You could draw a calendar, photographs, an icemaker, you could even use stickers!
3. Poke four holes on one side of the lid of the box.
4. Cut a pipe cleaner in half, and poke in holes on the lid. Twist together so that they don’t fall apart.
5. Take your two 6 by 4 ¾” pieces of cardboard and glue them on the inside of your fridge for shelves.
You could make fake food out of clay to put in your completed fridge for your Webkinz. You could make apples, salad – anything your Webkinz heart desires! You could even make a pizza to cook in your new Webkinz oven that you made! Just be sure to use your imagination, and your Webkinz will love playing with their new kitchen!
Do you have a great idea for a craft, recipe or party game? We’d love to hear them!


So cute and creative!
so cute!