Fancy Marbled Paper
Great news, everyone! Roberta here with a really awesome new craft to try out. It’s a great way to make marbled paper with shaving cream and food coloring! What you need: Cookie sheet, shaving cream (the foamy kind), liquid food coloring, pencil, printer paper, spatula What you do: 1. Put a layer of shaving cream in your cookie sheet. 2. Drip different colors of food coloring onto the shaving cream. 3. Swirl the food coloring around with your pencil. 4. Put your piece of paper on top of the colored shaving cream and press down gently. 5. Lift off the paper and scrape the excess shaving cream away with the spatula. 6. You should see a beautiful marbled design on your paper! 7. Use your paper to wrap gifts, make cards, or just get creative!
Craft: Build your own Wacky Sculpture
We’re having so much fun playing with the new Building Kits in Webkinz World it inspired us to create some real life Building Kits of our own! Here’s how you can build your own Wacky Sculpture: What you need: - Oven bake clay - Acrylic paint (optional) - Sculpting tools: toothpicks, craft stick, dull knives (with the help of an adult assistant) - paintbrush What you do: To make Wacky, mould one piece of clay into a large teardrop shape and set it down on the wide end. You can make a small slit at the top of the teardrop shape and separate it slightly to form Wacky’s ‘hair’. To craft legs, roll some clay into a thick sausage shape and cut in half with a knife. Shape one end into a foot (no toes!) Attach each leg to the side of the base of your teardrop shape, pointing outward. To make Wacky’s arms, roll a piece of clay into a slightly thinner sausage shape and cut in half. Form one end into a mitten shaped hand. Attach the arms to the side of Wacky above the legs. Smooth over the clay where the arms and legs attach to hide … Read more
Make Your Own Smoothie Moves Game!
Roberta here with another fun craft! This time, it’s making our very own version of the Smoothie Moves game! This is a great game you can play at a party – or the next time your friends come to visit. What you need: Six plastic or paper cups, large piece of round cardboard (big enough to fit all the cups), craft glue, masking tape, marker, small rubber balls or pompoms What you do: On each plastic cup, stick a piece of masking tape. On each piece of masking tape, write a number. This is what the cup is worth. Decorate the cardboard tray any way you like. Glue each cup to the round cardboard tray. When the glue is dry, practice tossing the ball or pompoms into the cups. Give each friend 3 balls or pompoms. Each ball or pompom that gets into a cup counts for the number of points written on the cup. Tally up each person’s points after their three turns. The person with the most points wins!
Make the Mining Game!
Roberta here with a really fun game craft! One of the great things about the Webkinz Road Trip is the games that you can play to try and win a prize. I figured out a really fun way to make a game that you can play with your friends. It’s based on the Gem Mining job! Here’s how to make a gem mine of your own. What you need: Fake plastic jewels in five different colors (three of each gem), box, gray paint, paintbrush, shredded newspaper or tissue paper What you do: Paint the box gray. This is your ‘mine.’ Put your jewels in the box. If you like, layer them with the shredded paper (so they’re distributed throughout the box). Have your friend reach into the box and pull out a jewel. Have them try to find the other two jewels that match the color they chose. If your friend gets all three jewels of one color, they win a prize! If the second jewel they pull out doesn’t match the first one, have them put both jewels back in and have someone else take a turn.
Roberta’s Craft: Homemade postcards
Roberta here with another fun craft! Here’s how you can make your very own homemade postcards! What you need: Cardstock cut into (size), markers, stamps, pens What you do: Decorate one side of your cardstock with a picture – you can draw your home town, a familiar landmark, or anything you like. On the other side, make three lines on the right half of the card (this is for your friend’s address). Write a message on the left side. Be sure to leave a space for the stamp on the upper right corner of the back of your card. Mail your card to surprise a friend!
Roberta’s Craft: Make your own stickers
Today at camp we had SUCH a great time! We got to make our own stickers. It’s pretty easy to do and also? A TON OF FUN! Here’s how we did it. What you need: Cardstock in different colors (this is a great way to use up old cardstock), scissors, double sided tape, craft glue, sequins, wiggle eyes, any other embellishments you want What you do: I sketched my sticker ideas out on scrap paper first, just to make sure they looked the way I wanted them to. I cut out my background first, and then pasted on pictures and icons to make the stickers. I added details with markers. When my stickers were dry, I added double sided tape to the back. When I want to stick my stickers, I just have to peel off the double sided tape backing and I’m good to go!
Roberta’s Craft: Homemade Beads
Making homemade beads is one of my favorite things to do. It’s so relaxing! Sometimes I make mine out of paper, but often I’ll mix up a batch of dough and make them out of that. Here’s how to make your own beads! What you need: 1 cup of flour, 2 tbsp cream of tartar, 1 tbsp vegetable oil, ½ cup salt, 1 cup boiling water (have a grown up help with this), bowl, wooden spoon, grown up assistant, oven, cookie sheet, small straw What you do: With your grown up’s help, put all the ingredients in a mixing bowl and start mixing them up. When you’ve got the dough mixed up, take it out of the bowl and squash it around with your fingers to make sure it’s really well combined. Roll little balls to make beads. Poke a small straw through your beads to make holes (don’t leave the straw in the bead). When you’ve made your beads, pop them onto a cookie sheet and have your grown up put them in the oven at 300 degrees Fahrenheit for about 30 minutes (until they’re dried out). Let your beads cool off. When the beads … Read more
Roberta’s Craft: Wrapping Paper
Roberta here with another fun (and easy) craft! Here’s how you make your very own wrapping paper! What you need: Empty soda bottle (as large or as small as you like), tempera or acrylic paint, large piece of paper What you do: Pour the paint into a shallow dish or tray. Dip the bottom of your soda bottle into the paint. Stamp the bottom of the bottle onto the paper. It looks like flowers! Now you’ve got your own flower-themed wrapping paper!
Roberta’s Craft: Flower Prints
You guys will NEVER believe the fun I had at craft camp today! I had the best time making a painting out of flowers. Sounds interesting, right? Here’s how to do it yourself! What you need: Flowers with different colored petals – we used purple, yellow, red and pink; flat rock, two pieces of white paper What you do: Put down one piece of the white paper. You’re going to want to do this craft outside (on concrete is the best place). Sprinkle your petals all over the paper. Put the other piece of paper on top. Start banging your rock around on your paper. This should release the colors in the flower petals. Lift up the paper to see how the colors look. When you’re happy with the result, discard the petals and proudly display your floral print! One special note: be careful when you’re banging your rock – don’t let your fingers get in the way!
Roberta’s Craft: Craft Stick Easel
Today’s craft is totally fun and adorable. And easy! You’ll be able to create your own little art gallery if you make a bunch! Here’s what you need to make your own craft stick easel: Small cardstock triangle, three big craft sticks, one small craft stick, craft glue, cardstock rectangle (this will be your canvas), larger rectangle with the middle cut out (this will be your frame) What you do: Glue the three craft sticks to the cardstock triangle, one overlapping each corner. Let the glue dry. When the glue is dry, bring one craft stick back (this is what props the easel up) and leave the other two at the front. There’s your basic easel! Now glue on the smaller craft stick so it can hold your canvas and frame in place. Cut out a rectangle from white cardstock. This is your canvas. Draw a picture on your canvas and glue a frame on. You can make as many easels as you like. You can paint your easel before you put a picture on it, if you like!
Roberta’s Craft: Rock Bug Collection
We had such a great time at craft camp this morning! The counselors told us we were going to make a bug collection, and initially I was a little grossed out. When they brought out trays of rocks and acrylic paint, I realized we weren’t talking about real bugs! Here’s how to make a (fake) bug collection of your own! What you need: Rocks in all different shapes and sizes (choose ones that remind you of insects), acrylic paint in all different colors, paint brush, craft glue, wiggle eyes, paper or plastic plate where your rocks can dry Optional: glitter, permanent marker, pipe cleaners, sequins What you do: Decide how you want each rock to look – what bug can you make from each rock? You can glue rocks together if you like (to make something like a caterpillar). Paint each rock and let it dry. When the first coat of paint is dry, add any details on with more paint (or a permanent marker, if you’re trying to add really fine details). Add wiggle eyes. Display your bug collection for all to see!
Roberta’s Craft: Fake Campfire!
Hey everyone! Roberta here with a super simple and wonderfully FUN craft! Today I’m going to show you how to make a fake campfire! What you need:Three paper towel tubes, brown craft paint, paintbrush, black craft paint, brown construction paper, yellow construction paper, red construction paper, orange construction paper, craft glue, scissors What you do: Cut out a brown construction paper circle for each end of each paper towel role. Glue them in place. When the glue is dry, paint each paper towel tube brown. These are your logs! When the brown paint is dry, paint on black lines to make the logs look like they have bark on them. When the black paint is dry, glue all three logs together in a campfire arrangement. Cut out orange, red and yellow flames from the construction paper. Glue the flames together and then glue them in place on your logs. For extra fun, I got a pencil and painted it brown to look like a stick. I then got a Styrofoam marshmallow and stuck it on the end! Now I can pretend I’m camping anytime I want!
Father’s Day gift ideas with Roberta
Hey everyone! Father’s Day is tomorrow, and I don’t know about you guys, but I’m pretty excited. My dad is amazing. He and I love to hang out (when he’s not traveling on business). I’m even named after him! (He’s Robert, I’m Roberta). So I wanted to come up with a few extra-special things to make my dad. Here’s what I’m going to give him tomorrow: Picture Frame This was pretty easy to make. I just got some wooden sticks, craft glue, paint, and a picture of me (the other side is empty for when my new brother or sister arrives – their picture can go in there). First, I glued four sticks together to make one square frame. Then I did the same for the other frame. I painted the frames. I used construction paper on the back to attach the two frames together (I just glued the construction paper rectangle to each square). Then, when everything was dry, I put in the picture of me. Aren’t I cute? Dad Coupons I made my dad a few coupons to use – but I decided to cut them into fun shapes, instead of just making a book. I … Read more
Polly’s Birthday Banner
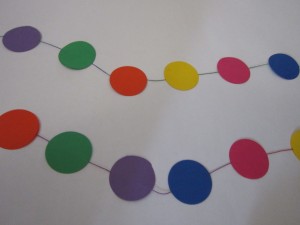
Roberta here with another great craft for Polly’s upcoming surprise party. Today, we’re going to make a recycled paper banner from scraps in my scrap paper box. Here’s what you need: Scraps of paper (different colors), string or yarn, glue stick, scissors, drinking glass, pencil Here’s what you do: Trace the drinking glass on each scrap piece of paper. Cut out all the circles. Glue two circles, back to back, on the yarn (sandwiching the yarn in the middle). Space your pairs of circles about two inches apart. Let the glue dry. When the glue is dry, hang up your banner!
A Special Treasure Box
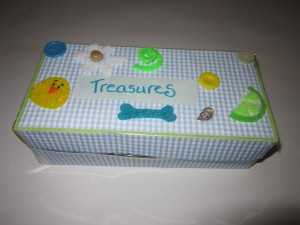
So since the baby is going to be here in a matter of months (eek!), I thought I might make him or her something special: a treasure box! Parents like to keep all sorts of mementos from when their babies are small, so I figured my parents would be happy to have something like that for my brother or sister. What you need: Kleenex box or shoe box, packing tape, fancy paper, craft glue, decorative items, plain paper, marker What you do: If you’re using a Kleenex box, cut about an inch and a half from the top, all the way around to make a lid for the box. Leave one long side uncut (this is the hinge). If you’re using a shoe box, use packing tape to tape one long side – this is the hinge. Decorate your box with the fancy paper. Use the craft glue to stick it to the box. Decorate the lid with all kinds of neat stuff: shells, rocks, stickers, felt shapes – whatever you like! Attach your plain piece of paper to the lid of the box and write “Treasure Box” on it. Present the box to your parents (or whoever it’s for).

