Craft: Paper plate Easter baskets
Roberta here with a really simple and fun Easter craft! If you want to make a cute basket, here’s how. What you need: Paper plate, acrylic or watercolor paint, paintbrush, stapler, cardstock, stickers, Easter grass What you do: Paint the front and back of your paper plate. Take your paper plate and cut eight slits in it, like this: Pull the flaps of paper so they overlap each other. Staple in place. Keep doing that (like this): And eventually, you’ll end up with this: Staple a handle across the top and decorate with stickers (use stickers or pieces of paper to cover up the staples). Fill with Easter grass and goodies!
Craft: Butterfly Wreath
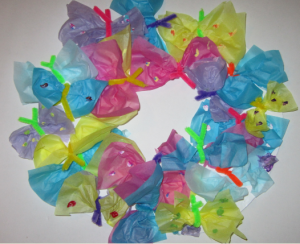
Spring is in the air! It was so warm outside today – and the air smells so good. I can’t wait until the flowers start to blossom and the butterflies start flying! To get a bit of a jump on the season, here’s a beautiful butterfly wreath you can make for your front door! What you need: Pipe cleaners (10), tissue paper, rhinestones, paint, cardboard wreath-shape or wreath form What you do: Take a rectangle of tissue paper and wrap the pipe cleaner around the tissue paper, securing it by twisting the two ends together (making two antennae). Paint dots on the wings. Make a whole bunch of butterflies and glue them to a wreath form, or a round piece of cardboard with the middle cut out. Hang on your door!
Paint Dot Spring Cards
So guess which rabbit got the pleasure of babysitting the, ahem, enthusiastic Millie Pig today? Me (Roberta)! Fortunately, Millie totally loves me – so she never gives me the same kind of trouble that she gives Molly. Millie just wanted to make crafts all afternoon, so it was fun for both of us. One of the best crafts? Q-tip blossom cards. Check them out! How did we do it? Easy! Here’s what you need: Acrylic paint in a variety of colors, Q-tips, cardstock folded like a card What we did: I poured the paint into shallow dishes. I showed Millie how to dip the Q-tip into the paint, and dab it onto the card. Continue dabbing to make a blossom. Don’t be afraid to layer colors! When your blossoms are done, let the paint dry. Draw on stems and maybe a vase. We made the cards for Mother’s Day (Millie likes to give cards to her grandmothers on that day as well, so she made three). It was a ton of fun!
Craft: Big Watercolor Flowers
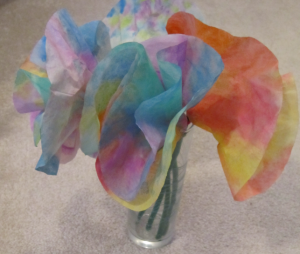
It might not be springtime quite yet, but I can’t help but make a few pretty flowers to decorate my room! Here’s how to make some of your own! What you need: Flower-shaped coffee filters (the basket kind), watercolor paint, Q-tips or paintbrush, water, cardboard (for laying the flowers out so they can dry), pipe cleaners, beads What you do: 1. Get the watercolor paints nice and wet – add lots of water. 2. Use the Q-tip or paintbrush to dab the colors onto the coffee filters. The colors will run together and be gorgeous! 3. Let the coffee filter flowers dry. 4. When the flowers are dry, poke a hole through the center and put a bead on one end to secure it in place. Twist the filter around the bead so it looks like a flower. You can put more than one filter together for a fluffier flower. 5. Put another bead onto the pipe cleaner (it will be below the flower) to keep the blossom in place. 6. Make a whole bunch and decorate your room!
Homemade Wrapping Paper
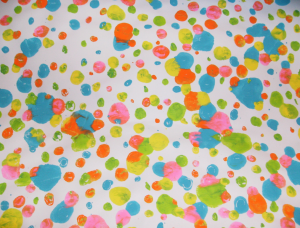
Roberta here with a fantastic (and easy) craft – homemade wrapping paper, perfect for making a friend’s gift extra-special. Here’s what you need:Two large pieces of newsprint or white scrapbooking paper, acrylic paint in different colors, paintbrush, water (for rinsing the paintbrush) What you do: Dab dots of paint all over the paper. Use lots of different colors! Press the second sheet of paper over top of the dots and smooth it down with your hands. Pull the pieces of paper apart –you’ll have splats of paint on both of them. Let the paint try. When the paint is dry, wrap the gift with the paper.
Roberta’s Craft: Valentine’s Rose
What you need:Hershey’s kisses in red or pink, cellophane, ribbon, skewer, floral tape, green paper, double-sided tape What you do: Put the kisses together, fat end to fat end. Use a piece of double-sided tape to hold them together. Wrap the kisses in cellophane, and tie it off at the bottom with a ribbon. Stick the skewer through the bottom. Wrap the skewer in floral tape, starting with the ribbon and cellophane at the top of the skewer. Cut leaves out of the green paper and glue or tape them to your skewer. Make a rose for everyone in your class!
Roberta’s Valentine Craft: Candy Calculator
Another wonderful craft to add to the bag of Valentine’s treats for my class! What you need: Cardstock, scissors, candy dots, double-sided tape, marker, printer paper , glue stick What you do: Measure the cardstock, and mark it so you can cut it into four equal rectangles. Cut along the lines you marked. You now have four ‘calculators’. Cut out small white rectangles from the printer paper. At the top of each calculator, glue a small white rectangle for a screen. Write a Valentine’s message like “You’re #1” or “U R GR-8!” or “U R 2 Cool!” Cut your candy buttons into squares of twelve (3 candies in 4 rows). On the bottom of the calculator, use double-sided tape to secure the paper the candies are on. Decorate the calculator with fun stickers.
Groundhog Day Puppet
This cute puppet comes complete with a snowy mound to peek out of on February 2. What you need: - Brown felt or paper - Pink felt or paper - White felt or paper - Googly eyes - Paper cup - Cotton balls - Scissors - Glue - Wooden craft stick - An adult assistant What you do: Cut a 2” wide heart, two ½” circles, and a 1” x 4” rectangle out of brown felt or paper. Cut a ¼” triangle out of pink felt or paper. Cut a ¼” square out of white felt or paper and cut a small slit in the middle of one side. Glue the two small brown circles onto the bottom of the heart, on either side of the point. These will form the ears. Glue the end of the white square without the slit onto the top of the heart in the middle. These will form the teeth. Flip the heart over so that the ‘ears’ and the ‘teeth’ are peeking out from behind the back. Glue pink triangle just above the teeth to form … Read more
Roberta’s Valentine: Sweet Butterfly
Roberta here with another fun Valentine’s Day craft! The big day is less than a month away, so I’m getting SUPER excited. Today’s craft is very easy – but totally cute! What you need: Wrapped sticks of gum (one per friend), construction paper, heart stickers, stick-on wiggle eyes (or stickers you can use for eyes), markers What you do: 1. Cut out two hearts from the construction paper. Stick them on your wrapped piece of gum, securing them in place with stickers. 2. Add stick-on wiggle eyes or other stickers as eyes. 3. Decorate the wings with markers and stickers. Write your friend’s name on the back of the wing. 4. Pass these out to your friends on Valentine’s Day – they’ll LOVE them!
Roberta’s Craft: Lovely Valentines
I know Valentine’s Day is still a few weeks away, but the truth is: it’s one of my very favorite holidays! I like to be well-prepared, so I’ve started making my Valentines early! Here’s what I’m doing this year: Roberta’s Valentine’s Treat bags. Everyone in my class is going to get a whole bag of cute treats. That’s why I’ve got to start now! First up, a bookmark! Our teacher, Miss Daisy, is always encouraging us to read more. This will help the kids in my class keep their places! What you need: Red, pink and white cardstock, scissors, glue stick, sparkles, stickers What you do: Cut out one red or pink heart per bookmark. The heart should be about 3 inches tall and two inches wide at the widest point. Cut out one white heart per bookmark. The heart should be about 2 inches tall and one and a half inches wide at the widest point. You’re going to glue most of your white heart to the pink or red heart. You’re just going to leave the pointy, bottom part … Read more
Roberta’s Crafty Gift: Personalized Stationery
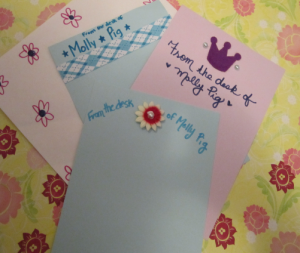
Everyone is trying to figure out what to get Millie for her birthday, but I’ve already worked out what I’m getting her. I’m making her personalized stationery. Millie has a pen pal, so I know she’ll appreciate this! What you need: Scrap piece of paperPencil12 pieces of colored paper Markers or colored pensStickers12 envelopes (that fit the paper you’re using) What you do: On a scrap piece of paper, figure out what kind of design you want to create. On each piece of colored paper, add your design. You can use stickers, markers and pens to create a totally unique look! Personalize the envelopes, too! Put everything into a nice box and add a pretty pen. Your recipient will LOVE their stationery set!
Craft: Yearlong scrapbook
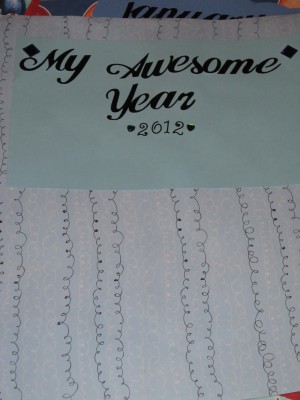
I love keeping a scrapbook of all the fun things I do in a year. And what better time to start a craft like this then in January? Here’s how you do it: What you need: Fourteen pieces of scrapbook paper, markers, fancy paper, scissors, glue stick What you do: Staple the fourteen pieces of scrapbook paper together. The front sheet is the cover page, the back sheet is the back cover. At the top of each page, write the names of the months, starting with January. During each month, make little notes or paste little mementos from that month on the page. At the end of the year, you’ll have a record of all the things you did!
Craft: Pretty Bug Collage
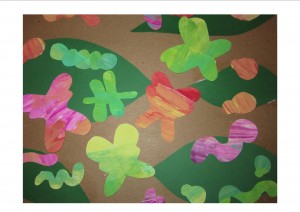
It’s not exactly warm outside, but you can bring a hint of spring to your room with a pretty bug collage! What you need: Large paper, watercolor paint, paintbrush, scissors, craft glue, Bristol board or foam core, green paper What you do: Paint your large paper in all sorts of different colors. You don’t need to do one specific design, you can just be random. Let your paint dry. When the paint is dry, cut out all sorts of different bug shapes. Cut out leaf-shapes from your green paper. Glue it to your Bristol board or foam core. Glue your insects to the leaves. When the glue is dry, hang up your bug picture for all to see!
Crafty Critterz: Webkinz Pinball Machine

Who doesn’t love pinball! Now your plushies can get in on the action. Read more
Crafty Critterz: Far North Sleigh

Your Webkinz Reindeer would love to have a sleigh of its own! Read more

